Sink or Float: Apple Science for kids of all Ages
It’s that time of year again; Apple Time! I don’t know about you, but I love all things fall! Except pumpkin spice latte – don’t hate me.
When I think fall, I think APPLES!
..and leaves and pumpkins. And I love doing activities and crafts to go along with all of those things. You can see our apple preschool activities we’ve done. And our pumpkin ones here.
This Sink or Float Apple science lesson can be done with kids of any age; preschool through middle school, just adjust the level of difficulty and involvement of the child based on what’s appropriate for them. I’ll give suggestions throughout the lesson instructions.
I'm referring to this activity as "Apple Science" because it starts with apples (which most kids are familiar with) and then moves into exploring other fruits (which kids may or may not be familiar with). But you can use whatever fruits (or even veggies) you want.
There are different levels of extension you can add to this so that it turns into a challenging science activity for older kids. Scroll to the bottom for those extensions.
Skills addressed: predicting, recording results, drawing conclusions, irregular verbs, liquid measurement, calculating mass and density
If you want to be more scientific, make predictions about the objects and record the outcomes (even if just in a very simplistic way). You can create your own chart for recording, or you can download and print out my free Sink or Float Observation Printable (at the bottom).
Sink or Float Parent/Teacher Prep
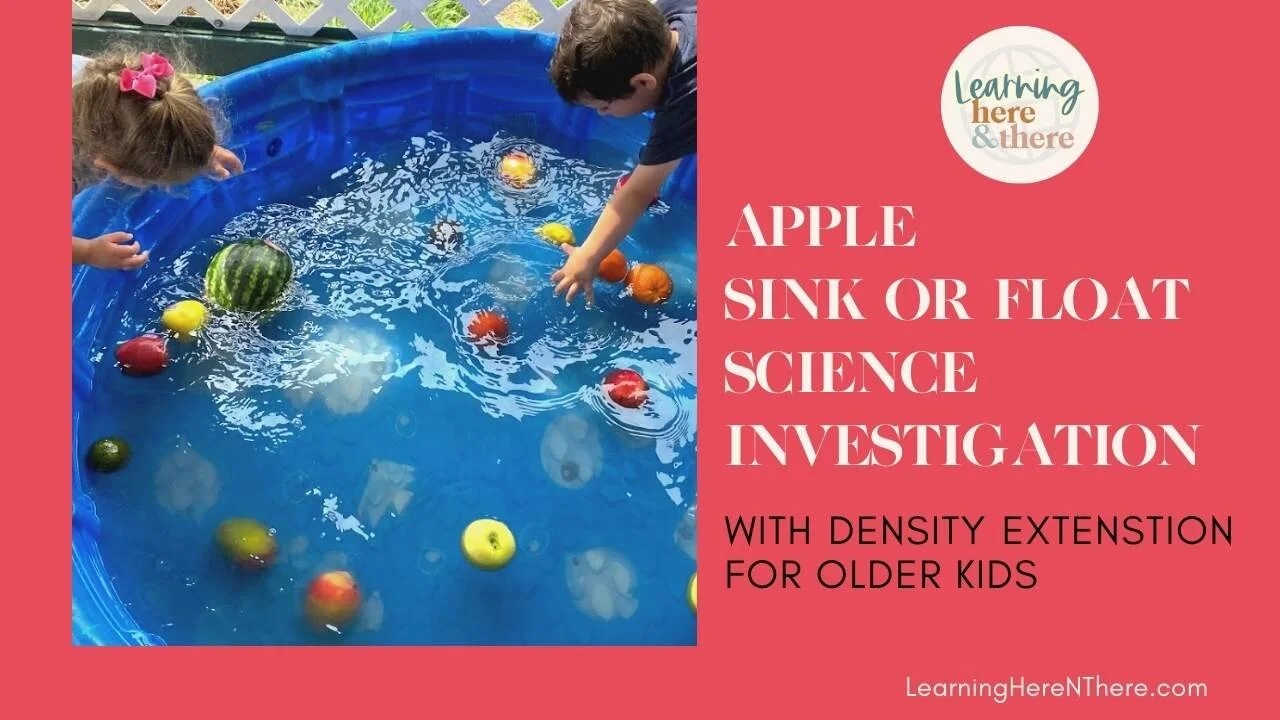
Gather apples of different colors and other fruits (pears, oranges, lemons, mangos, nectarines, watermelon, kiwi, avocados, limes, etc.) Try to gather enough fruits for each kid to have multiple turns.
Set up the sink or float station. If you're including the watermelon (which I highly recommend since it surprises many), then you need a deep enough amount of water to allow the watermelon to float. You can use a bathtub, a kiddie pool (though these take a lot of water), a half whiskey barrel, or a five gallon bucket.
If possible, practice ahead of time so you know what to expect.
Set up the "landing zone." I used a sheet of green construction paper to represent things that floated and a sheet of red paper to signify items that sank. I put each colored paper in its own plastic sheet protector to keep the colored paper dry. These papers will be the landing zone for fruits that have been dunked. It's a great way for preschoolers to "record" their results. (More on this below.)
Set up a way for older kids to record results. You can print the observation chart below and put it on a clipboard.
Have a cutting board and paring knife ready to do the challenge activities. (optional)
What to Expect with Preschoolers
Before starting, talk about rules for water play during the activity. (Are they allowed to get in the water or splash each other, etc.?)
Young kids may want to throw multiple items in quickly (because playing in water is fun!), but it’s important to only give them one item at a time to put in the water. This will force them to slow down (at least a tiny bit) and really focus on that one item to see how it behaves in water.
The kids will probably want to eat the fruit. Tell them you'll wash and cut the fruit together when the activity is over.
If working with multiple young kids, they will have difficulty waiting their turn. Keep the fruit out of their reach so you can insist on doling out one at a time.
Sink or Float Activity
Hold up one apple and ask each child to predict (guess) if it will float or sink in the water. (Make sure each child, no matter how young or old, gives an answer.) Give older kids time to record their prediction on the Observation Chart.
Let a child place the apple in the water while everyone watches it.
Discuss what you see. (Keep this short.) The same child takes the apple out of the water and places it on the landing zone. (Explain that the green paper is for things that floated.)
Repeat with apples of different colors.
After all the apples are on the landing zone. Discuss what they notice so far. (They all float and the color doesn't affect that.)
Continue with the other fruits one at a time making sure each child makes a prediction (at least verbally) before dunking the fruit.
Stop periodically to discuss what you notice. (Does the size matter? Does the shape matter?) (Do the heavier fruits sink?)
Challenges to Try
Try to stack apples to see if they will still float.
Stack something that sank on top of an apple. Will it still float?
If you cut an apple in half will it still float?
Do the apple seeds float?
If you cut the rind off an orange or lemon will it float? (This might surprise you.)
Wash and cut the fruit, and have a tasting party. Maybe the kiddos will discover a new fruit they like. Can they taste the difference between a lemon and a lime? Introduce the word sour.
The Language Component
There are two bits of language acquisition you can work on (naturally) during this activity; irregular verbs and forming complete sentences (to include scientific vocabulary for the older kids).
"Sink" is an irregular verb. It doesn't take on the traditional endings when we change it to the past tense. Practice using this verb in its different tenses as much as possible. "Will it sink?" "Which one sank?" "Did you think it would sink?" "Did you say it sank or floated?"
Help kids turn their thoughts into complete sentences gradually throughout this activity. Model sentences first yourself as you lead the discussion. "I wonder if the apple will sink or float." "I predict the mango will float." "It surprised me to see the watermelon float." Ask questions continuously (using similar language) during the activity "Do you think it will float?" Gradually simplify your questioning to something like “What do you think?” This will force the child to put things into their own words and in turn will increase their vocabulary. For kids struggling with the language part, feel free to give prompts such as, “I think….” But ultimately give them time to form their thoughts into words. (Sometimes this takes a lot of patience.)
Extensions for Older Students
For older kids, ask them to use the terms "denser" and "less dense than" instead of just telling you that the fruit sank or floated. All objects have density, including water. So items that float in water are less dense than water, and items that sink are denser than water. The video I linked to at the bottom will explain this more fully.
For older kids, I strongly recommend they practice the scientific skill of recording their results. If this is a struggle, feel free to work on the chart together. But it’s very important for students to understand and practice the scientific method; which, in its most basic form, means prediction- observation - recording results - drawing a conclusion.
This process of drawing a conclusion (which roughly means forming a theory using what you noticed from the results of the experiment) often leads to a new experiment. So don’t be surprised if your kiddos want to extend the experiment with new objects. Let their natural curiosity guide them. And let them continue to explore this idea of density (sink or float) for as long as possible. You can decide together if you should start another chart to record results.
Continuing with the study of Density:
If the kids want to know why some things sank while others floated, have them watch this video by SciShow Kids. It's entertaining enough for the preschoolers, but does a good job of showing what density means.
Density: In a nutshell, the tiny particles that make up matter (whether solid, liquid, or gas) are sometimes densely packed together (making them denser than water so the object sinks), and sometimes those particles are spaced farther apart (making them less dense than water so the item floats).
After watching the video, I demonstrated the concept of density to my 8 year old using glass gems and large mason jar lids (of the same size). The gems represented the microscopic particles of an object. One object (lid) had particles densely packed together, while the other had fewer particles that were more spaced out.

two mason jar lids containing glass gems to represent very dense particles versus less dense particles
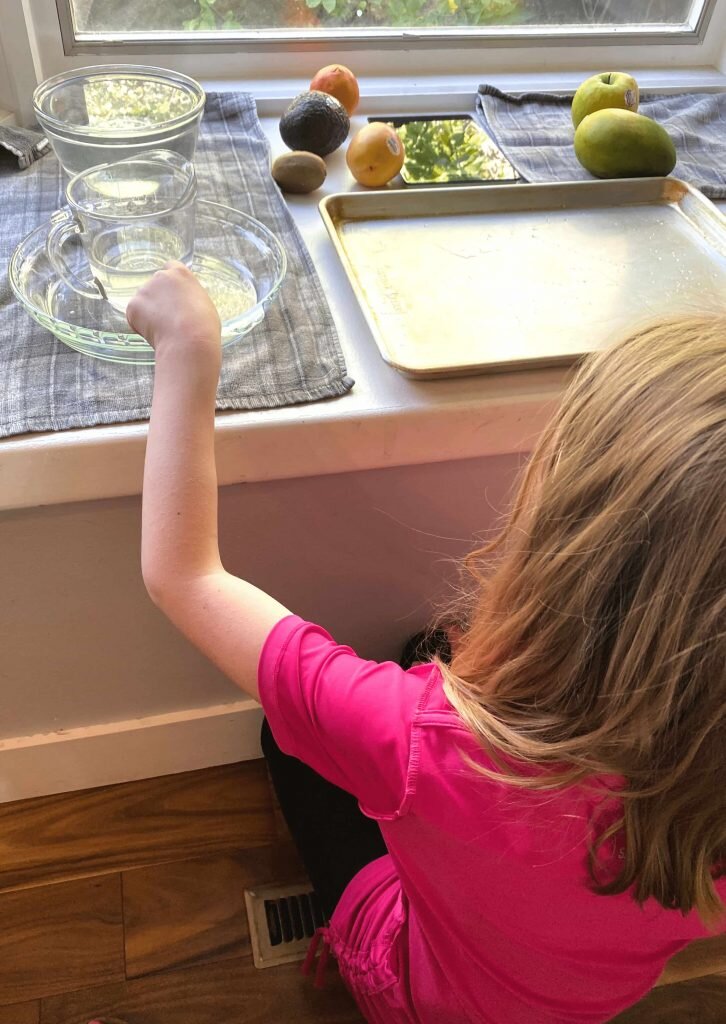
You can end the lesson with this simple explanation of density. Or you can continue by finding the density of the fruit used in the original sink or float activity. My 8 year old had a lot of fun with this next part, but I definitely wouldn't recommend it for preschoolers. You have to try to be really precise with it.

The formula for calculating density is Mass divided by Volume. To find the density of an apple, you need to find its mass and its volume. A kitchen scale is an easy way to find the mass. Be sure it is set to grams. To find the volume, you need to set up a process where you can calculate the amount of water an object displaces. You can download our simple Density Calculation Chart at the end of this post to help you keep track of your measurements.

child putting an apple in a bowl of water to measure density
Here's a look at how we did it. (after some trial and error)
The large glass bowl on the cookie sheet is filled to the brim with water.
After weighing a piece of fruit on the digital scale (and recording the mass in grams),
we placed the fruit gently into the bowl of water and watched how much water spilled over the edge of the bowl.
Then we carefully removed the fruit (I suggest using tongs), and set it on a towel.
Next, I carefully moved the glass bowl off the cookie sheet and set it aside. I poured the water from the cookie sheet into the measuring cup. (As it turns out, cookie sheets pour really well.) Then we recorded the water in mL.
Finally, we returned the glass bowl to the cookie sheet and poured the water from the measuring cup back into it (adding more if necessary to make sure the bowl was again full to the brim) so we could repeat the whole process with the next piece of fruit.
child measuring amount of water in a glass measuring cup
So now that you have all this data, now what? It's calculation time. Remember it's mass divided by volume. We weren't about to mess with the tedium of long division for this process. We just got out the calculator.
Note: Water has a density of 1. It's actually slightly less (0.99802 for example) depending on the temperature and other factors. You can see a handy chart and learn more about it from this great website USGS.gov
To make sense of your final calculations (which come out in decimals), compare them to 1. Is that decimal number less than 1 or greater than 1? (if there is not a one before the decimal point, then it's less than one.) Your final calculations are the density of the fruits.
If you end up with a fruit that sank, but its density does not appear to be greater than 1 (greater than water's density) based on your calculations, this is a good time for a discussion on variables. What things in your experiment might have been off just the tiniest bit that could have affected your calculations? For example, I was already skeptical of the accuracy of my digital kitchen scale. Now I'm convinced I need a new one. Also, if the water in the bowl wasn't exactly all the way to the brim, the amount displaced when a fruit is put in it won't be 100% accurate. Spillage when pouring is a possible problem, too.
We had a lot of fun with this process of calculating density. I was happy to give Pooky a chance to use so many scientific skills (observing, measuring, recording, calculating, drawing conclusions). This process led to lots of questions and discussions and extra experiments. In fact, Pooky asked if there was anything that stayed exactly on top of the surface of the water. I immediately thought of a leaf, so we ventured into the backyard and gathered things from nature to test.
This led to one more surprise for her because I included a rock that she was convinced would sink. But it's a form of lava rock, pumice, that is so full of air pockets that it is actually less dense than water and floats. I wish I had snapped a pic of the look on her face when she saw this!

These printable charts are free for you to download. In exchange, please do me a huge favor and share this post with others in some way.
The image below is Pinnable. Thank you!
Click the links below to download the printables.
Sink or Float Observation Printable
As a next step, you could purchase this STEM Density pack from Gift of Curiousity (not an affiliate).
Or you might be interested in this hands-on lesson about how boats work by 123Homeschool4me.
I hope you and the kiddos have fun exploring density. Remember to let their curiosity be your guide.
